My blog has moved!

You should be automatically redirected in 4 seconds. If not, visit
http://www.beyondthebaby.com.au/superorganisermum/
and update your bookmarks.

The Life of a Super Organized Mum

Friday, July 31, 2009

Morning Routine

As per yesterday's post I am getting organized for my return to work and coming up with a few solutions which I think will help make life easier for our family through this transition time. These are things I have learnt through working previously- some things work and some don't. The mornings for every household where both parents have to leave for work are generally CRAZY. And so to be able to create a bit or organization I wrote out a routine for our morning of what we have to get done and the time frame we have to do it. This will hopefully prevent my darling husband from saying "what do you want me to do" all morning!!!


There is also a list at the bottom of the page of things that need to be done in the morning before we go to bed. These include-

- Make sure clothes are ironed and laid out ready for the morning
- Tidy house/ living area before going to bed.
- Make sure kitchen is clean and tidy from dinner and all dishes are stacked in the dishwasher
- Lay out lunch bags and coffee mugs for the morning and pack and part of the lunches that can be pre packed.

Thursday, July 30, 2009

Communication Book

I made this from an ordinary notebook the other day. I am going back to work on Monday after a few months off and so I am trying to get everything organized before I go back. I came up with the idea to create a communications book for the Nanna's to write down what Flynn has been up to during the day. They both often write down Flynn's daily adventures on a piece of paper and sometimes if I don't get to see them in the afternoon if Simon gets home first so I don't get to hear about Flynn's day.

This is the front cover of the notebook-
This is the back of the notebook but it gives you an idea of what it looked like before minus the spots but I added those.
This is what the inside first page looks like with a little photo of Flynn and a typed out copy of Flynn's daily routine as this has slightly changed in the months I have been at home. They will be able to write out whatever they want, what he ate when he slept etc.

Wednesday, July 29, 2009

Pre-cutting your vegetables and fruits

I am not sure where I saw this little gem of a tip I know it was on someone's blog and I have done it ever since. When I get home from my shopping trip I take the time to go through the fruit and vegies and pre-wash and chop any that I can. It makes for a super easy dinner time when you can just got to the fridge and grab out any that you need and use them with your dinner!!! I have found this system saves us a lot of time and money as the wastage decreases a lot. If it is cut up already you are more likely to eat it.

I use the Tupperware Fridge smarts. They are great containers and keep the greens crispier for so much longer. I get on average 4-5 weeks for my carrots for example, a lot longer than if you just put them in the fridge. You have to be disciplined enough to make time after each shop to do this which can sometimes be hard but it is worth the extra initial effort.


Tuesday, July 28, 2009

A few layouts.

I thought I would share a few recent layouts I have completed for my Family album. My style is really simple and classic. I don't take forever to complete my layouts as I have a lot of photos to keep up to date with and I want to keep up to date with my scrapbooking and enjoy the process. I love that getting it done feeling and having the completed layouts in the albums. I tend to gravitate towards one pages spreads and multi photo layouts as I like to get as many photos on the page as I can!!!!

This was one of a few layouts I did for Mothers Day for 2009. I tend to duplicate layouts as well as I have ongoing Family albums and also Flynn has his own albums. This works for me as I just do double the layouts and then split them between the albums.

Monday, July 27, 2009

A weekend away

We had a much deserved break away this weekend and went to stay at a friends holiday house down south in Margaret River. It was a great relaxing getaway and I took a ton of photos. I have so much scrapbooking to catch up on now !
Some beautiful beach views-
The house was just gorgeous-

Sunday, July 26, 2009

Garden Layouts

I have made an effort this year to make sure I scrapbook the everyday stuff and not just the family events like birthdays. And so these layouts are of our ever changing and growing garden. These will be great to look back on in a few years when the garden is not so new anymore.

These are the first bulbs I have planted and so I wanted to document their growth in our garden. I try and make an effort to journal on most of my pages now as well.


Saturday, July 25, 2009

Chocolate chip cookies

So you might have noticed from some of the recipes I have posted that I like to keep cooking simple but yummy. I am a busy working mum and don't have a lot of time with everything else I have on to spend hours in the kitchen for one dinner/dessert. And so I multi task, cooking several dishes at once or making some quick cookies while dinner is cooking. The other night was so exception I was waiting on dinner to cook and so I made some quick cookies for a mothers group meet up the next day.

So give these a try if you want a no fail cookie recipe that is super quick and only requires one bowl and 10 minutes in the oven !!!


125g butter chopped at room temp
1/2 cup brown sugar
1/2 cup caster sugar
1 egg
1 tp vanilla extract
1 1/4 cups plain flour
1/4 cup self raising flour
1/2 tp bicarb soda
180g packet of choc chips/ smarties or M&Ms's


Cream butter and sugars together in an electric mixer until light and fluffy.
Beat in egg and vanilla extract.
Sift in flour and bicarb soda.
Teaspoon mixture onto a baking tray and bake for 10 minutes in a moderate oven.
Cool on tray and then eat yummo!!!!!!

Friday, July 24, 2009

Completed Project 365 albums

I realized I had not yet posted how I have been putting together all of photos that I have been taking everyday for the 365 project. So here they are-


The 2 albums I am using this year are WR Memory Keeepers ring binders-


The album spines close up-


This is the cover page for my first album for January- June-


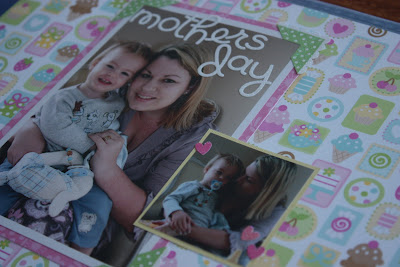
This is what a double page spread looks like, these were my photos from last week-


I have been using up a lot of the extra paper I had in my stash as you dont see a lot of it once you put the photos on. Next year I will be using up the rest of the 365 kit I bought this year so I will be using divided refills so that will make the project a lot easier with a lot less sticking. I have found the best thing to do is to set myself up in front of the TVone night a week/fortnight and stick down and journal while watching TV. This is a great way to keep up to date and prevents me from getting behind.

Thursday, July 23, 2009

Storing Artwork

As a parent we get a lot of artwork home from 'school' (daycare) and so when I read through a book late last year that had artwork stuck into a scrapbook album I had a light bulb moment. What a great way to store and keep kids artwork in a place that is easy to access and that Flynn is able to look through. It has worked really well so far, I just pop the artwork into the album every time Flynn brings something home, or does something at home that I know I want to keep.

Every 6 months or so I get on and type out what the artwork is and when and where it was made. I cut these up into strips and adere them to the cardstock and then stick down the artwork (I crop it down if necessary).
I am thinking that this album will cover 2-3 years and I will probably end up with 3-4 of these albums that span Flynn's school years. I know that my artwork from when I was little was kept in a large cardboard folder and has been damaged over the years through moving houses. It is sitting in a cupboard somewhere and I have only pulled it out a few times as it is so hard to look at. I hope this solution will prevent this for Flynn.

Another great solution I saw was to scan in the artwork and resize it then print the images and scrapbook them onto a layout. This is a great way to include your kids artwork/ handwriting/ school projects in your scrapbooks.

My Cover Page- Some of the inside pages-
Some more of the inside pages-
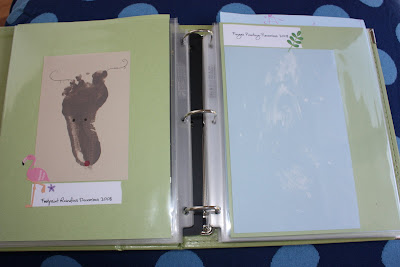
This is the spine-
The album is an A4 size (8.5 x 11) by WR Memory Keepers in the Kiwi colour, I usually get mine from here-

http://store.scrapbook.com/wr-40361-6.html


If anyone has any other ideas they use for storing kids artwork I would love to hear from you!!

Wednesday, July 22, 2009

When you can't find your 2 year old.....

Look in the study!When my husband lost Flynn for a few minutes the other day he found him in his study on the computer checking his email ! So cute, he has never done this before and luckily Simon is well trained to make sure he snaps a photo when funny things like this happen.This is most definitely my photo of the day.


Your Life Story

I am so excited about this new project. Becky Higgins posted this blog post on her site today
I love this idea of documenting my own life story. This is something I have never done before but would love to have something similar written by my own ancestors. What an amazing legacy to look back on when you are older and to leave for your children to remember you by.

And so I got started today. I have picked my album and I have printed all of the pages out on white cardstock, and I have cut the pages down ready to stick into the album. This is a big project but will so be worth it once complete. Now I just have to convince Simon that he should do it as well!!!!

I will be posting progress pictures as I complete this. This is just the assembly of the actual album.

The front page (not stuck down yet)

This is what the inside pages look like before I have stuck them down/ decorated them. This is the album I am using it is by Making Memories and is 8x8 in the Sea Foam colour.


Tuesday, July 21, 2009

Cupakes

I use the same recipe every time I make cupcakes. Boring I know !!! But it works and it is a really easy recipe to make!!

125g butter
1 teaspoon Vanilla extract
2/3 cup caster sugar
3 eggs
1 1/2 self raising flour
1/4 cup milk


Beat all ingredients in an electric mixer until just combined. Then increase speed to medium and beat for about 3 minutes until mixture is smooth and has turned a paler colour.

Drop mixture into paper cases and bake for about 20 minutes in a moderate oven (180).

See?? Super easy. Then decorate as you desire !! I made these ones last week for my birthday.

Monday, July 20, 2009

POTD

Some more recent Photo's I have taken for the 365 project. Our daffodils a few weeks after they came up are looking gorgeous !!


Flynn absolutely loves the trike he got for his birthday and he loves to put his "treasures", mainly food on the back and rides around, so cute!! I am still keeping up with the project but it can be a challenge to keep motivated. There are lots of different ideas floating around about how to keep fresh and motivated in the project. Some of these include having different weeks for different things such as-

House photos

Places you go

Meals you cook

Thing you love

Technology you use.

I may think about doing something like this later on in the year but I haven't run out of everyday stuff to take photos yet so I am doing ok!!

Sunday, July 19, 2009

Cinnamon Cookies


MMMM I love these cookies but I don't make them all of the time as they take a little bit longer as you have to roll out the dough and cut them out etc. But they are pretty yummy so I thought I would share the recipe here.


135g butter chopped at room temp
1/2 cup caster sugar
1 egg yolk
2 cups plain flour
3 teaspoons cinnamon
1 teaspoon bicarbonate of soda
1/3 cup golden syrup


Beat butter and sugar together for 2-3 minutes until creamy. Add egg yolk, beating well.

Sift flour, cinnamon and bicarb soda together.

Warm syrup in microwave for about 20 seconds.

Fold flour mixture into butter mixture with syrup to form a dough.

Knead dough gently onto a lightly floured surface. Roll between 2 sheets of baking paper to about 0.5cm thick.

Use cutter to cut out shapes.

Bake in 180 degree oven for 10-15. Cool on trays. Sometimes we have them plain other times I decorate with icing and sprinkles as per the photos.

Enjoy : )

Something different

We went to a friends wedding last night. She is quite a crafty girl and she had lots of little details at the wedding that she had made herself and that were quite different and so I thought I would share a few.

They had a candy buffet where you could fill a bag of your favourite sweets, such a cute bonbon idea!!


She made this gorgeous bouquet herself from beads, isn't it stunning !!! I absolutely love weddings, I think in an alternate life I would have loved to have been a wedding planner myself. My sister just got engaged a few weeks ago and as time starts to pass and think more and more about helping her to plan her special day I get excited about all of the new choices and options there will be since I got married 4 1/2 years ago.

I remember so vividly the year that went into the planning of the wedding and trying to make such a special efforts to keep into perspective that this was the first day of our new life. Making sure to focus on your relationship after the wedding is more important than the day itself.

Thursday, July 16, 2009

Individual Storage in the Playroom

This is how I like to organize some of the boxes in the play room that have a lot of small pieces. So this first photo is the puzzle box, I found it really frustrating that we could never find all of the pieces to actually play with the puzzle. And so I sorted them all into individual glad bags so that Flynn can get out one puzzle and actually play with it. It is working great so far, I love that we don't have to spend any time hunting for any pieces before we can start playing.

This middle box is just miscellaneous stuff that has no home in any of the other boxes. The last photo is just one of the boxes with cars in it. Hope this gives you some more ideas for toy storage !!

Wednesday, July 15, 2009

Toy Storage

Argh, toy storage the bain of a parents life!!! It seem relentless that we are constantly being given toys and having the find a spot for them. We are lucky enough to have an awesome playroom, it is huge and allows for use to have room to grow with our family.
I did a bit of a toy re-sort in the last few days as after Flynn's birthday we had so many more toys and i wanted to get them all sorted out into the correct boxes. Now we have everything sorted out and it feels so great!!! We have different boxes for music, games, cars, trains, block etc. It seems to be working really well so far it is so great to be able to find all of the pieces to stuff when we want to play something!!

This Ikea system really works for us as we are able to separate everything and it is so big so it allows us room to grow with extra children and toys etc. We did the large wall shelf on one wall to be able to store all of the craft stuff like paints and glue etc that we don't want Flynn to be able reach without supervision.
The great thing about this system is that it is sooooo easy to pack everything away when the kids trash the room when they come over : ) I will take some photos tomorrow in better light on how I organize what inside the cubes.

Tuesday, July 14, 2009

My Husband : )

Well after much complaining over the last few week since I started this blog here is a photo of my wonderful husband Simon. (I think he was feeling a little left out!!) We met through a friend 7 years ago and have been in love ever since. : ) He is such an amazing father and Flynn absolutely adores and idolizes him. I have seen him change immensely for the better since Flynn came along and every day he becomes more caring, nurturing and patient in his endeavors to become the best parent possible.
So there you go hunny, now you are on my blog : ) Thankyou for you patience in my photo taking, blogging and messy scrapbooking adventures!! You are always there to help when I have a new idea, room to paint or ann area to reorganize. I love you.

Ice Cream Sandwich


Mmmmm I love this icecream though be warned it is very very sweet!!!! To make it you will need:

1 packet of Malt o Milk biscuits
1 can of condensed milk
1 container of whipping cream
1 packet of maltesers/ m&m's

Line to bottom of your container with the malt o milk biscuits.
Place the condensed milk and whipping cream in a large bowl and whip uising a kitchen mixer for about 5 minutes.

Mix in crushed maltesers and then line the top with the rest of the biscuits and then freeze. : )


Sunday, July 12, 2009

Things I Love Album

I recently completed an album called things I love as I wanted to have a place where all of the things that make up my life come together in an album with some journalling. It was a great project to do and I thought I would share a few pictures of the completed album. I wanted to this album as I want my children to know who I am as I person and not just their mother. 40 years from now they will be able to look back and they will have a snapshot of what I loved in my life in June 2009. I am planning on doing the same album 5 years from now to see what has changed.

Some of the thing I put into my album were, family, friends, photography, travel, pets, motherhood, organizing, list making, gardening, pets. Obviously you have to individualize this to what you love in your own life at the moment

Banana and Raspberry Muffins


This is a regular recipe I use here at home and I thought I would share it on the blog : )


1 1/2 cups self-raising flour
1/3 cup caster sugar
60g butter
2/3 cup mashed banana (approx 1 large banana)
1/2 cup raspberries
1 egg
1/2 cup milk


In a large bowl rub together flour, sugar and butter until it resembles fine breadcrumbs

Stir in mashed banana, raspberries, egg and milk to combine.

Spoon mixture into prepared muffin pans and bake at 190 degrees for about 20 minutes

Easy : ) and super yummy!!! I also substitute raspberries for blueberries or strawberries, whatever I have on hand.


P.S. The cake stand is Maxwell and Williams and the plastic cake matt underneath is from Ikea : )

Saturday, July 11, 2009

Photo ideas for 365

I know that some of you reading are participating in Project 365, where you take a photo every day and I thought I would post some of my photos taken over the last few months that I probably would otherwise not have shot if I had not been doing the project. 6 months in and with one album complete I am so happy I started on this journey to document this year of my life, the everyday stuff not just the people in my life but what it is that makes up all aspects of my days.


With my job I spend a lot of time in the my car so it is kind of like my office!!
Flynn playing happily one Saturday morning with his train set.


One of the things I have learnt doing this project is to try different angles and I am loving it. I have taken some of my favourite photos this year just changing the angle a little.


Some yummy easter egg cookies.


Some new bedding for our guest room.


Hope this helps give you a bit of inspiration to think outisde the box a little on this project as it soon gets a little boring taking photos of your little cherub/s 365 days a year!!!